Translate this Page:
SA410, SA700 and SA702 PRODUCT FAMILY
Photoelectric sensing chamber, particularly sensitive to slow smouldering fires in living rooms, bedrooms and hallways, whilst resistant to nuisance alarms.
SUPERIOR FEATURES
- Battery Operated
- Operating Light (LED)
- Flashes Approximately every 45 seconds confirming unit is powered.
- Low Battery Warning
- Low battery warnings often start at night. Silence the audible warning for ten hours by pressing the test button, thus avoiding removing the batteries. Change the batteries the following day.
- Alarm Pause
- Silence your smoke alarm by momentarily pressing the test button. Ideal when non-emergency smoke (eg. steam) causes nuisance alarms. The red light flashes every 7-8 seconds to remind you that the smoke alarm has been silenced. The alarm will automatically reset after 10 minutes.
- Sensitivity Test Button
- Test sensitivity, circuitry, batteries, horn.
- Loud 85 Decibel Piezo Electric Alarm
- Automatically resets when hazardous condition has passed.
- Easy Installation
- Fixings supplied
SPECIAL FEATURES
Interconnect 'i'
Connect up to 12 alarms together so that when one alarm sounds all properly connected alarms with this facility will follow.
Long life sealed battery 'LL'
Model numbers with the suffix 'LL' have a long life battery sealed in to prevent tampering.
For example a model SA700LLi is an alarm with a sealed in battery that can be interconnected to other alarms.
BE PREPARED
Smoke and heat alarms properly installed and maintained are an essential part of a good home fire safety programme. Review fire hazards and eliminate dangerous conditions whenever possible. When fire strikes, a prepared and practiced escape plan could prove vital. Your local fire brigade may be willing to advise you. Call them and ask. Consider and discuss the following safety hints:
- Ensure everyone is familiarized with the alarm signal.
- Always test doors with your hands before flinging them open. If they feel warm, fire may be walled up behind them - leave closed and find another escape route.
- Don't waste time collecting possesions. Rouse all occupants and leave the building. Your life is more valuable!
GET OUT. STAY OUT. GET THE FIRE BRIGADE OUT.
- Keep everyone in a set meeting place after you escape.
- If trapped inside, stay close to the floor, cover mouth with cloth, conserve breath as you crawl to safety.
- Keep all doors and windows closed exectp for escape purposes.
- Prepare and practice an escape plan before a fire starts!
- Draw a floor plan. Have fire drills often. Practise your escape.
1.
DRAW A FLOORPLAN. HAVE FIRE DRILLS OFTEN. PRACTISE
-
As a minimum, smoke alarms should be located between sleeping areas and potential sources of fire such as living rooms and kitchens. In single storey homes with one sleeping area a smoke alarm should be installed in the hallway, as close as possible to the living accommodation.
To ensure audibility in bedrooms no smoke alarm should be further away than 3m from any bedroom door. It may be necessary to install more than one smoke alarm, particularly if the hallway is more than 15m long. In single storey homes with two separate sleeping areas, a minimum of two smoke alarms is required, one outside each sleeping area. In multilevel or split level homes, as a minimum a smoke alarm should be installed on the ground floor between the staircase and any rooms in which a fire might start and on each storey in circulation areas which form part of the eascape route (normally hallways and landings).
NOTE: Heat alarms should not be used in escape routes instead of smoke alarms. They should only be used in the applications listed below in addition to smoke alarms and should always be interconnected with smoke alarms.
- Additional alarms should be installed in bedrooms in aticipation of fires originating there, caused by faulty wiring, lights, appliances, smokers or other hazards.
WHERE TO LOCATE
- For best protection, smoke alarms should be installed in every room in your home, apart from those listed on page 5 LOCATIONS TO AVOID. Heat alarms should be used in kitchen, boiler rooms, laundry rooms, garages and such like, where smoke alarms would be unsuitable. All alarms must be interconnected.
- Install smoke alarms in circulation areas at a distance no greater than 7.5m from the farthest wall, no greater than 7.5m from a door to any room in which a fire might start and no greater than 7.5m from the next smoke alarm. In rooms protected with heat alarms the smoke alarm should be no futher than 5.3m from the nearest heat detector.
- When heat alarms are installed in a room, they should be at a distance no greater than 5.3m from the farthest wall, no greater than 5.3m from a door to any room in which a fire might start and no greater than 5.3m from the next heat alarm.
-
As it is impossible to predict the source of a fire, the best location for an alarm is usually the centre of a room or hallway. If it is necessary to place a smoke alarm on a wall, always locate the detection element of the alarm 150mm to 300mm (6 to 12 inches) below the ceiling and the bottom of the alarm above the level of the doors and other openings.
NOTE: Heat alarms should not be wall mounted.
- In rooms with simple sloped, peaked or gabled ceilings, install smoke alarms on the ceiling 900mm (3 feet) from the highest point of the ceiling. 'Dead air' at the peak of a ceiling may prevent smoke from reaching the alarm in time to provide an early warning.
- Closed doors and other obstructions will interfere with the path of smoke and heat to an alarm, and may prevent occupants on one side of a closed door from hearing an alarm on the other side of the door. Install sufficient alarms to compensate for closed doors and other obstacles.
-
Read page 5 LOCATIONS TO AVOID.
Read page 13 'LIMITATIONS OF SMOKE & HEAT ALARMS' in this manual.
CAUTION: Research indicates that substantial increases in warning time can be obtained with each properly installed, additional alarm. It is strongly recommended that the advice in 3 above be followed to ensure maximum protection.
2.
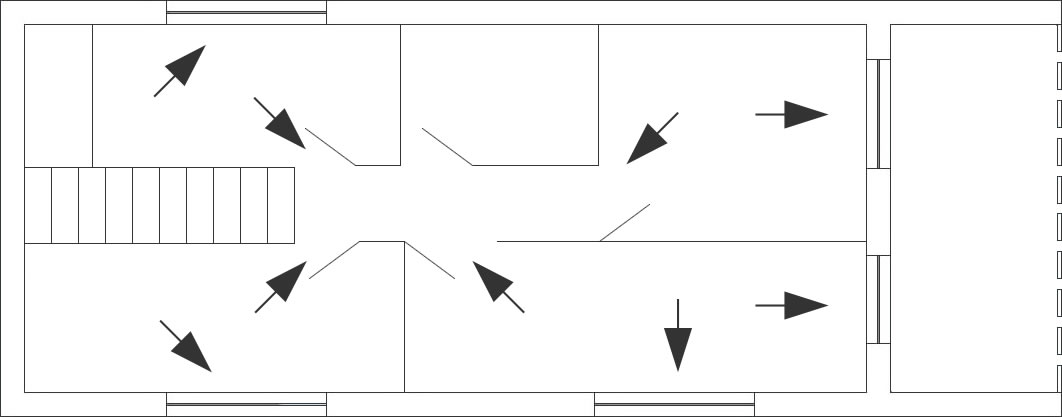
Room Colours
Dining Room
Kitchen
HallBedroom
Living Room
Garage
Single storey, one sleeping area.

Single storey, one two sleeping area.

Two storey dwelling.

Smoke alarms for limited protection
Additional smoke alarms for better coverage
Heat alarms
IMPORTANT: These alarms are intended primarily for single-occupancy private dwellings. For use in other applications the manufacturer's advice must be sought.
3.
LOCATIONS TO AVOID
DO NOT locate alarms:
- In turbulent air from fans, heaters, doors, windows, etc.
- In high humidity areas such as bathrooms and shower rooms, or where the temperature exeeds 39°C (100°F) or falls below 5°C (40°F).
- At the peak of an 'A' frame ceiling. 'Dead air' at the top may prevent smoke from reaching the alarm in time to provide early warning.
- Less than 300mm (12") from the wall when mounted on the ceiling.
- In insect-infested areas. Tiny insects may affect performance.
- In Kitchens, garages, laundry rooms or boiler rooms. Combustion particles from cooking or car exhaust and dust and moisture could trigger a 'nuisance' alarm.
- In very dusty or dirty areas. Dirt and dust can build and impair performance.
- Within 300mm (12") of light fittings or room corners.
- In locations which would make routine testing or maintenance hazardous (eg over a stairwell).
- On poorly insulated walls or ceilings.
- Near objects such as ceiling decorations which might impede the path of smoke or heat to the alarm.
- Within 1500mm (5 feet) of flourescent light fittings.
Futher help and information may be found in BS5839 Part 6.
CARAVANS AND MOBILE HOMES
The National Caravan Council (UK) (N.C.C.) requires that all new or used caravans sold by its members be fitted with an approved smoke alarm. The BRK-Dicon SA410 family and the First Alert SA700 / SA702 family are N.C.C approved for this purpose.
Touring Caravans
- The prefered position for fitting the smoke alarm is horizontally on the ceiling in the living area.
- As close to sleeping area as possible.
- Whenever possible out of line of sight of the kitchen area.
- DO NOT locate in the kitchen or bathroom areas. Cooking fumes and high humidity can trigger nuisance alarms.
- DO NOT locate smoke alarms close to exhause fans or air conditioning units, which could draw smoke away from the alarm.
N.B. In older, poorly insulated caravans, layers of hotter or colder air surround the uninsulated walls and may prevent smoke from reaching the smoke alarm. Therefore, in poorly insulated caravans, place smoke alarms on an inside wall, 6 inches from the ceiling.
WARNING: When installed inn touring caravans, test smoke alarm operation after vehicle has been in storage, before each trip and at least once per week during use.
Caravan Holiday Home
- The prefered position for fitting the smoke alarm is horizontally on the ceiling in the living area. Avoid proximity to the kitchen.
- An additional smoke alarm may be fitted in one or more bedrooms.
- DO NOT locate in kitchen or bathroom area. Cooking fumes and high humidity can trigger nuisance alarms.
- DO NOT locate smoke alarms close to exhaust fans or air conditioning units, which could draw smoke away from the alarm.
Park Homes
- If only one smoke alarm is to be fitted, it should be located horizontally on the ceiling, either in the living room or the hall, but not in proximity of either kitchen or bathroom.
- Additional alarms can be fitted in bedrooms.
- DO NOT locate alarm close to exhaust fans or air conditioning.
4.
INSTALLATION
- Separte the alarm from the mounting plate. This may require you to turn the alarm clockwise while holding the mounting plate.
- Locate the mounting plate in your chosen posiition (see page 3 WHERE TO LOCATE) and mark the position of the mounting holes. Drill the holes using a 4.75mm drill. Insert the anchor plugs and screw the base plate to the chosen position. DO NOT OVER_TIGHTEN THE SCREWS, this will distort the mounting plate.
- Test Button
- Sounder
- Alarm Base Mounting Hole
- Operating Light
- Alarm Base Mounting Hole
- Interlinking Alarms. When interlinking alarms, use twin speaker or bell wire to connect alarms lil to like. i.e. positive terminal on one alarm to positive terminal on the other and negative to negative. See Fig 1 for location of connections and connection screws. Connect both alarms before fitting batteries. Test interlinking by pressing the test button on one alarm and listening for alarm sound on all others. It may be necessary to operate the test button more than once.
-
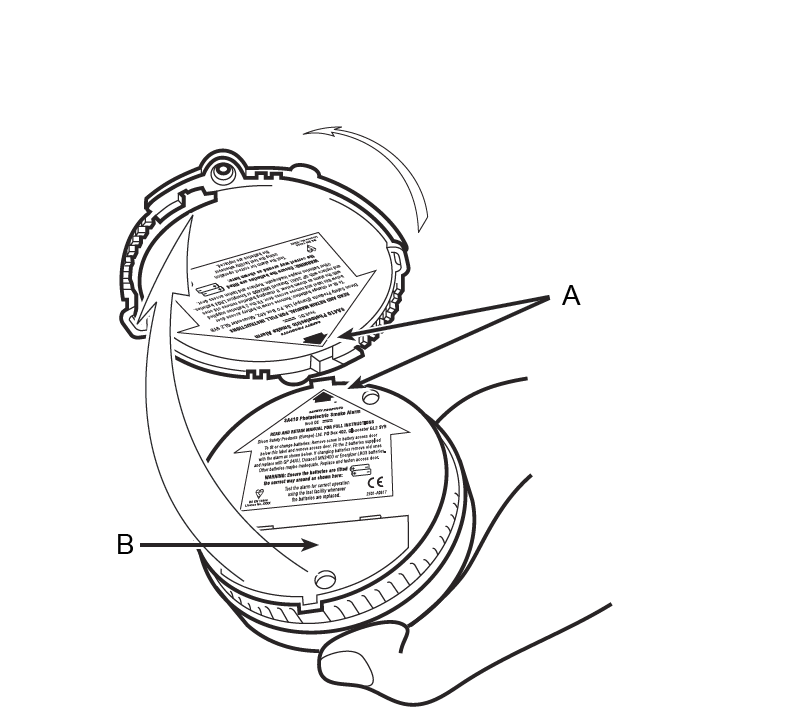
Fitting/Changing the batteries (Not applicable to the LL and LLi models)
- Undo the screw and remove the battery access door from the back of the alarm (see Fig 2). Fit two new AAA (LR03) batteries (supplied with a new alarm) in the battery bay; making sure they are fitted the correct way round by referring to the diagram on the back of the alarm. Allow ten seconds before testing the alarm, see page 7 BATTERIES.
- Refit the battery access door.
WARNING: USE ONLY DURACELL MN2400 OR GP 24AU BATTERIES OR ENERGIZER LR03. OTHER BATTERIES MAY BE INADEQUATE.
- Line up the arrow on the back of the alarm with the arrow inside the mounting plate and inset the alarm (see Fig 2). Once the alarm is inside the mounting plate twist it anti-clockwise to lock it into place. On the LL and LLi models this action turns the alarm on.
- Test the alarm as described on page 7 TEST THE ALARM.
- To remove see Fig 3.
WARNING: DO NOT SCREW THE BASE PLATE OF THE ALARM TO ITS MOUNTING SURFACE WITH THE ALARM FITTED TO IT. DUST FROM THE FITTING PROCESS COULD CONTAMINATE THIS VERY SENSITIVE DEVICE.
FIG.1
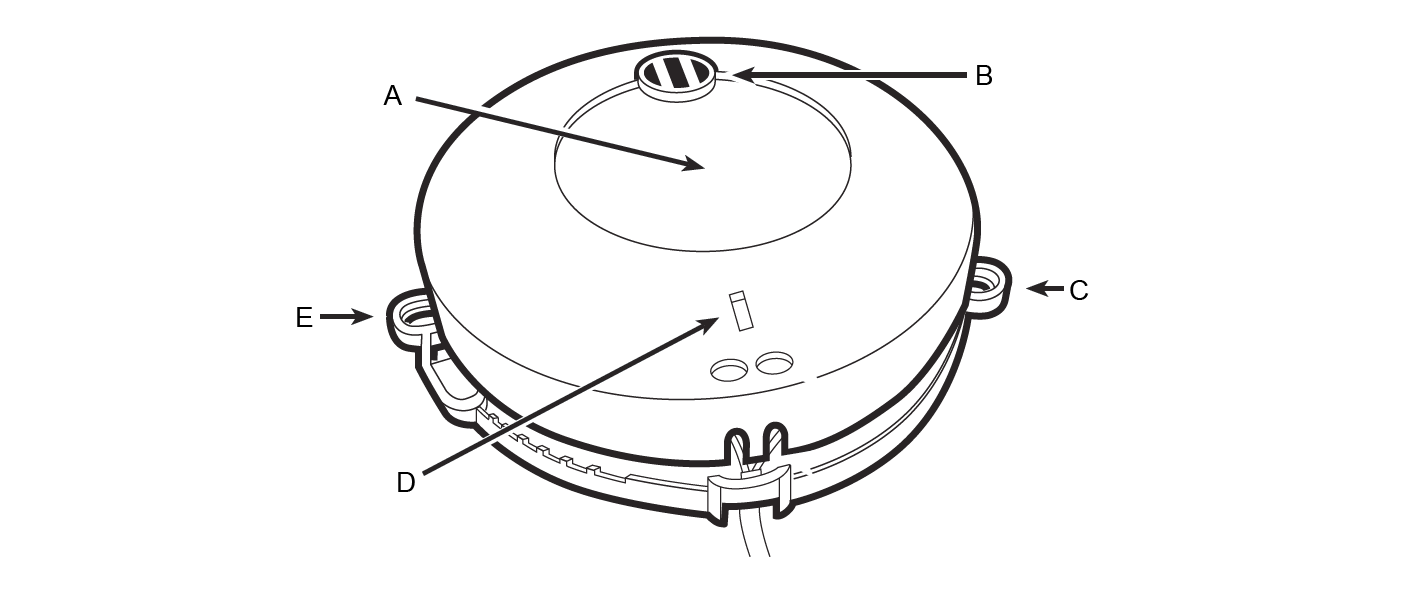
FIG.2
- Line up the arrows and insert the alarm into the base.
- Battery Cover
6.
TESTING THE ALARM
- Press and release the test button to test the alarm. The alarm should sound three times.
- After testing check that the red light flashes appromiximately every forty seconds (see Fig 1).
- Test the alarm once a week to ensure correct operation. Storage in low humidity, and certain transportation conditions, may cause electrostatic charges to build up in the alarm system housing. Although harmless, they may increase the length of time that the horn sounds upon the battery insertion or test button operation. The condition may be cleared by gently wiping the outside of the plastic cover with a clean, damp cloth.
WARNING: The electronic test button provides a full test of the unit's functionality. DO NOT try to test the alarm with a naked flame, as this may present a potential fire hazard in itself and contiminate the alarm.
ALARM WARNING SOUNDS
FIG.3
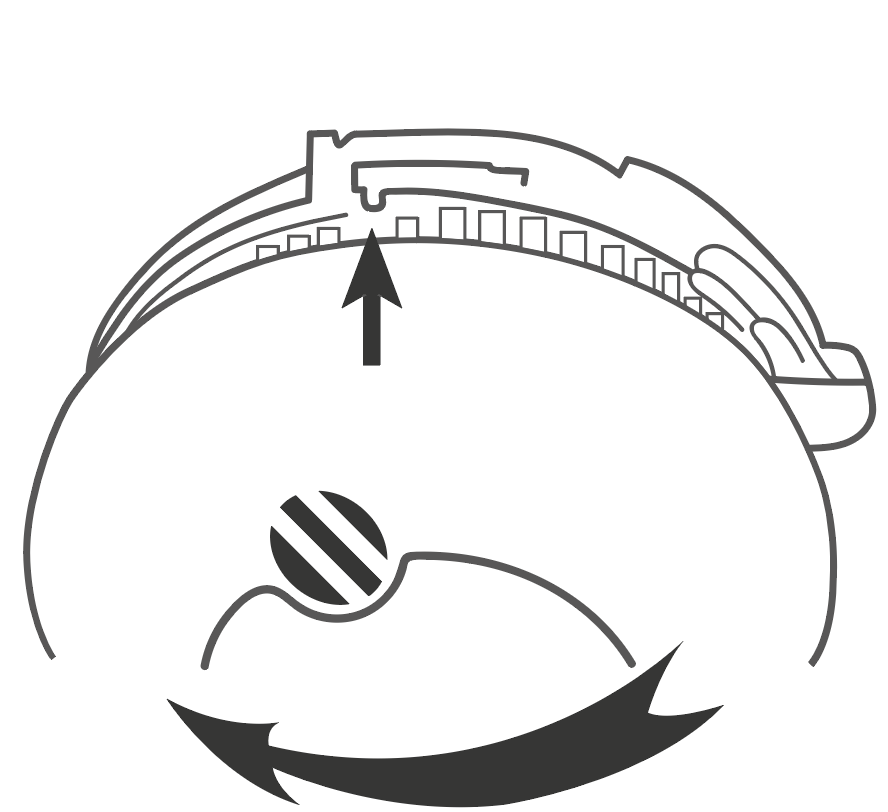
To remove alarm from the ceiling push upwards on this part of the alarm base with any small tool (SA700LL only) then turn alarm clockwise.
- Full Smoke Alarm with flashing LED.
- One Beep every 45 seconds indicating.
- Two beeps every 45 seconds indicate a malfunction.
- One beep every 12 seconds indicates the test button jammed on.
NOT APPLICABLE TO LL & LLi models.
- Your alarms requires two AAA (LR03) alkaline batteries. Under normal use, the batteries should last approximately one year.
- Low Battery Warning. Alarm beeps every 45 seconds for up to 30 days when battery needs replacing.
- Low Battery Warning Silence Low battery warnings often start at night. Silence the audible warning for ten hours by pressing the test button, thus avoiding removing the batteries. Change the batteries the following day. The led flashes twice every 45 seconds to remind the low battery warning has been silenced.
IMPORTANT: Test alarm using test facility whenever batteries are replaced.
THE BATTERY IN THE LL AND LLi MODELS SHOULD LAST 10 YEARS, THEY ARE NOT REPLACEABLE.
In the event of a low battery warning, return the alarm under warranty. At the end of the 10 year life of the alarm, please displose of it at an approved recycling facility.
SIMPLE MAINTENANCE
Vacuum every six months to help the unit working efficiently. Keep vacuum nozzle from touching the unit.
MALFUNCTIONS
Problems are indicated by three events:
- The alarm beeps twice every 45 seconds (indicates a malfunction).
- The alarm does not sound upon using the test button
- The operating light remains steadily on or off. (i.e. does not flash approximately once every 45 seconds, when the unit is not in alarm).
5.
TRY THE FOLLOWING
- Inspect for obvious damage.
- Visually check that unit contains recommended battery type.
- Check that batteries are properly connected.
- Gently vacuum as recommended above.
- Replace batteries
If these procedures do not correct the problem, do NOT attempt repairs. If the smoke alarm is within warranty period and terms, indicate the nature of the problem and return the unit with proof of purchase to distributor. Units beyond warranty cannot be economically repaired.
FALSE ALARMS
Abnormal air conditions may cause the highly sensitive smoke alarm to give a 'false' alarm. DO NOT DISCONNECT THE BATTERIES. If no fire is apparent, ventilate the room and/or operate the alarm. Pause by pressing the test button.
WARNING: IF THERE IS ANY QUESTION AS TO THE CAUSE OF AN ALARM, ALWAYS ASSUME THAT THIS IS DUE TO AN ACTUAL FIRE AND FOLLOW YOUR FIRE EMERGENCY PLANS.
Do not assume the alarm is a nuisance alarm and press the test button to activate the Alarm Pause.
Dust can have an adverse effect, vacuum as recommended above.
Do not paint the unit.
Avoid contact with aerosols and cleaning fluids.
Other factors such as nicotine and insect contamination may also adversely affect the alarm.
LIMITATIONS OF SMOKE AND HEAT ALARMS
Quality smoke & heat alarms are designed to provide the earliest possible warning of fire and smoke at reasonable cost. Early warning can mean the difference between a safe escape and no escape at all. Alarms do, however, have limitations. Alarms cannot work without power. Battery operated alarms will not work without proper batteries, with dead batteries or if batteries are not properly installed. Mains powered alarms will not work if their mains power supply is cut off by an electrical fire, an open fuse, a circuit breaker or any other reason. If you are concerned about the reliability of either batteries or your mains power supply for any of the above reasons, you should install both battery and mains powered smoke alarms in your home, or mains powered smoke alarms incorporating a back up power source. (In the event of a mains power failure, alarms with battery or capacitor back up will only work for a limited period, such period being dependant on upon the condition of the standby battery or the retained charge in the standby capacitor).
Alarms are incapable of sounding the until smoke or heat reaches the sensing chamber. Anything preventing this from reaching the detector, such as a closed door, may delay or prevent an alarm. A smoke alarm cannot detect fire in the walls, chimney or roof unless and untill a significant amount of smoke reaches the alarm. An alarm on any given floor should not be relied upon to detect fire on any other floor. For these reasons a smoke and heat alarm should be installed in every room or at least on every level of your home. Smoke and heat alrms may not provide protection for a smoker smoking in bed, for children playing with matches, or for violent explosions resulting from escaping gas.
Installation of smoke & heat alarms is only part of a complete home fire safety programme. BRK Brands Europe Ltd smoke and heat alarms are manufactured to the highest standards to ensure faultless operation and long life. The manufacturer do, however, recommend that no alarm should be used for more than 10 years, in order to minimise the chance of a fault occurring. Your smoke and heat alarms are not a substitute for property, disability, life or otherinsurance of any kind. Appropriate insurance coverage is your responsibility. Consult your insurance agent.
8.
DISPOSAL
New European Directives on the disposal of Electronic Waste (WEEE) came into force in 2005.
This product, the batteries and other accessories must not be disposed of as unsorted municipal waste and must be collected separately at the end of the products life. Contact your local authority for information about collection points in your area.
GURANTEE
BRK brands Europe Ltd., ("the Company"), gurantees its enclosed smoke alarm to be free from defects in materials and workmanship under normal use and service for a period of five years from the date of purchase. (With exception of the LL and LLi models.) BRK Brands Europe Ltd. makes no other express guarantee for this smoke alarm. No agent, representative, dealer or employee from the Company has the authority to increase or alter the obligations or limitations of the Guarantee. The Company's obligation of this gurantee shall be limited to the repair or replacement of any part of the smoke alarm which is found to be defective in materials or workmanship under normal use and service during a five year period commencing from date of purchase. (With exeption of the LL and LLi models.) The Company shall not be obligated to repair or replace smoke alarms which are found to be in need of repair because of damage, unreasonable use, modifications or alterations occurring after the date of purchase.
How to obtain guarantee service
If service is required, return the product to your retiailer.
Battery: BRK Brands Europe Ltd. make no guarantee, express or implied, written or oral. including that of merchantability or fitness for any particular purpose with respect to battery, with execption to the LL and LLi models.
BRK Brands Europe Ltd,
Unit 6, Carter Court, Davy Way,
Waterwells Business Park,
Quedgeley, Gloucester, GL22DE, UK
www.brkdicon.eu
www.firstalert.eu
PLEASE KEEP THIS MANUAL IN A SAFE PLACE
Battery operated photoelectric Smoke Alarm
Owners Manual
SA410, SA700 and SA702 PRODUCT FAMILY

PLEASE KEEP THIS MANUAL IN A SAFE PLACE
When installing this alarm for use by others,
please leave this manual or a copy with the end user.
BRK Brands Europe Ltd,
Unit 6, Carter Court, Davy Way,
Waterwells Business Park, Quedgeley, Gloucester, GL22DE, UK
www.brkdicon.eu - www.firstalert.eu
9.
Copyright © 2025 Safelincs Ltd